Fluent Server
下面内容以ubuntu为例,网络环境为NJU校园网,4H8G服务器(PVE虚拟机)。
SSH Client
推荐使用termius或者Xshell,warp广告打得挺多的,但是感觉有些三不像,其他的ssh客户端要么功能不强大,要么颜值不够。
Terminus
XShell
Xshell、Xftp需要协同使用,如过需要还得加上X11做桌面转发。
网络
校园网认证
- NJU校园网认证使用以下命令:
curl https://p.nju.edu.cn/api/portal/v1/login -X POST -d '{"username":"学号", "password":"密码"}'
参考 Do1e/p-dot-nju-login:使用命令行登录南京大学校园网(p.nju.edu.cn),统一身份验证方式,相关功能已集成入 NJUlogin
科学上网环境
- 配置科学上网环境:
git clone --branch master --depth 1 https://gh-proxy.com/https://github.com/nelvko/clash-for-linux-install.git \
 && cd clash-for-linux-install \
 && sudo bash install.sh
参考 nelvko/clash-for-linux-install:😼 优雅地使用基于 clash/mihomo 的代理环境
在按照指示设置好代理之后,如果仍然不能连接网络,请将tun模式打开:
clashctl tun on
注意,每一次开启一个会话都需要用clashctl on启动代理,或者直接将如下环境变量写入zshrc:
export http_proxy="http://127.0.0.1:7890"
export https_proxy="http://127.0.0.1:7890"
export all_proxy="socks5h://127.0.0.1:7890"
export no_proxy="localhost,127.0.0.1,::1"
clash脚本的逻辑在/opt/clash/script/clashctl.sh中。
mihomo的配置文件在/opt/clash/runtime.yaml中
[!NOTE] Notice 注意这里的install脚本只会把clash相关的命令写在bashrc里面(因为用的bash!)。具体可以tail一下
~/.bashrc:source /opt/clash/script/common.sh && source /opt/clash/script/clashctl.sh && watch_proxy如果喜欢使用zsh,只需要把这一行加到
~/.zshrc就行
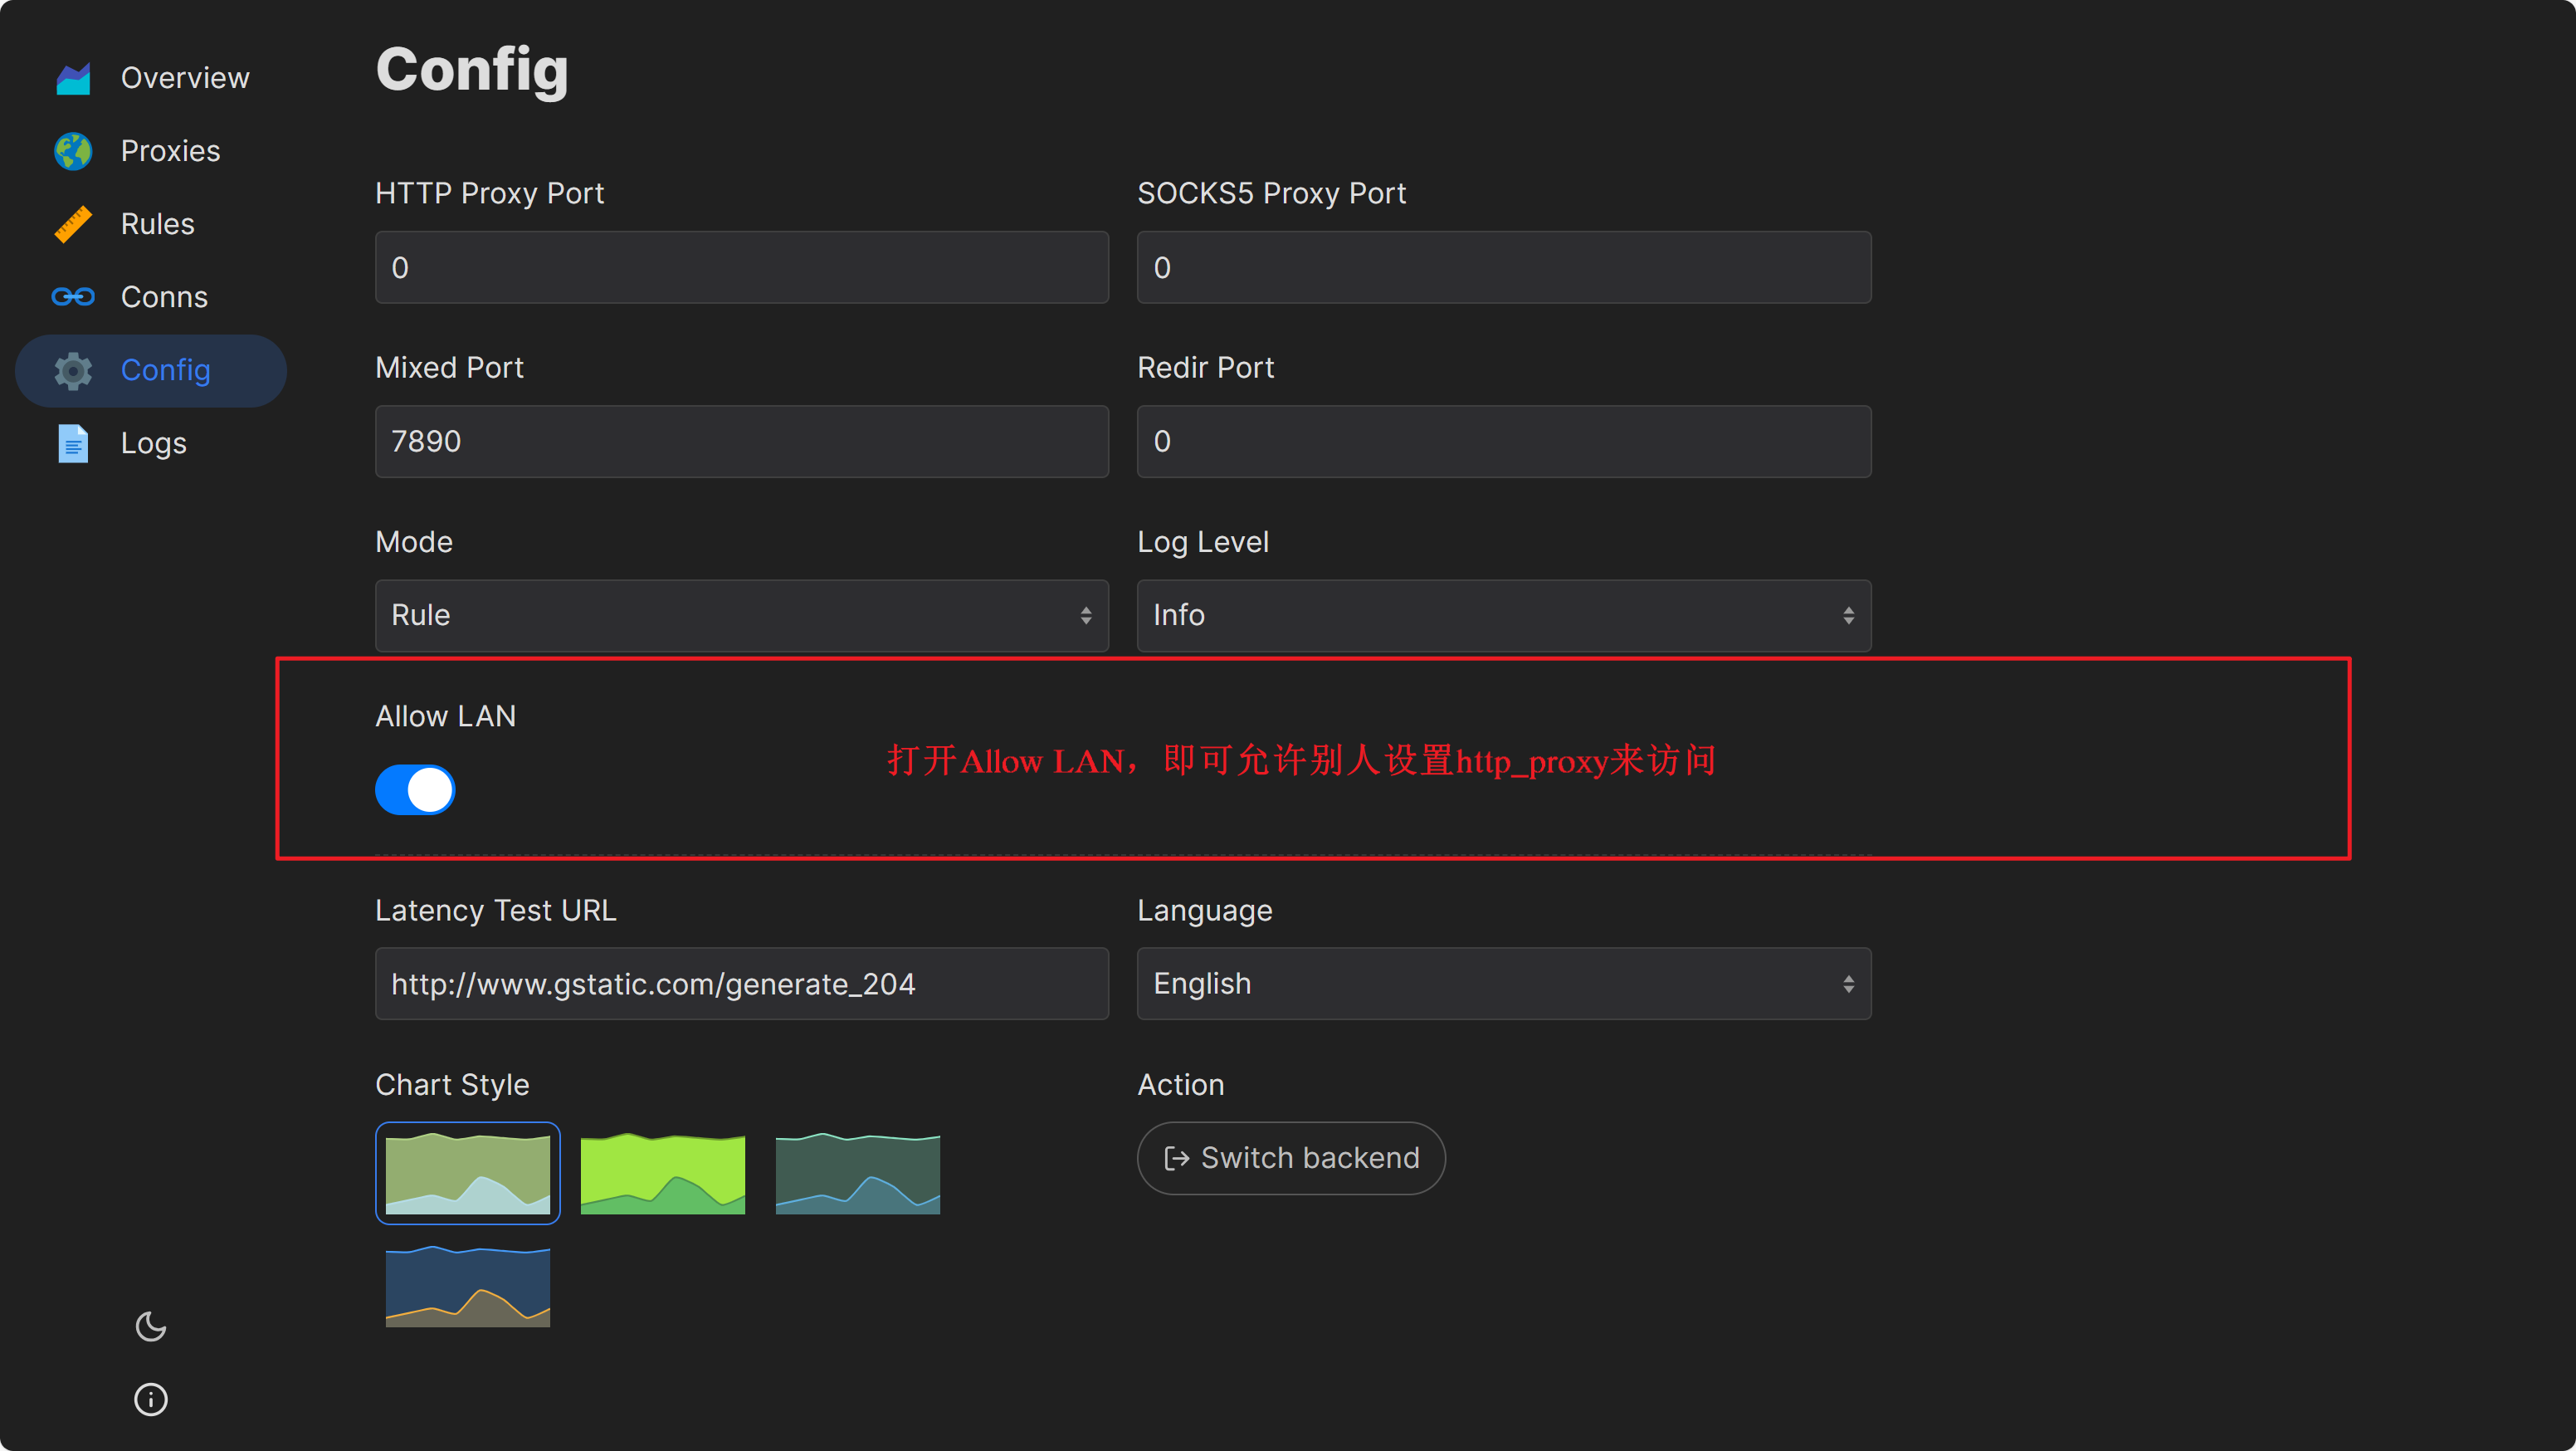
如果想要一台其他机器也走这一台机器的clash代理,可以在webui中允许LAN。
 也可以通过配置文件来找,因为
mihomo加入了systemd进程,可以查找其.service文件
直接使用mihomo
- 安装mihomo
- 配置mihomo的systemd和配置文件
- 记得找个地方记住配置文件的位置,或者mihomo -t,可以检查配置文件的位置
南大校内镜像
- NJU CITE Lab 提供的校内镜像 - Do1e
- mirror站PyPI 镜像源使用帮助 — NJU Mirror Help 文档
- pypi镜像:用于pip和uv。https://mirrors.nju.edu.cn/pypi/
代理管理脚本
分享一个自用的代理管理脚本:
function proxy() {
    # ------------------------------------------
    # 1. 配置区域 (可以在这里添加更多代理和网址)
    # ------------------------------------------

    # 代理池数组
    local PROXY_LIST=(
        "http://yama:yama@172.26.41.148:7890"
        "http://114.212.85.120:3128"
        "http://127.0.0.1:7897"
        # 你可以在这里继续添加,例如: "socks5://127.0.0.1:1080"
    )

    # 测试网站池数组 (建议把访问最频繁的放前面)
    local TEST_SITES=(
        "https://www.baidu.com"           # 国内连通性基准
        "https://www.google.com"          # 翻墙连通性基准
        "https://conda.anaconda.org"      # Conda源
        "https://github.com"              # 代码托管
        "https://huggingface.co"
)

    # ------------------------------------------
    # 2. 逻辑区域
    # ------------------------------------------

    # 颜色定义
    local GREEN="\033[32m"
    local RED="\033[31m"
    local YELLOW="\033[33m"
    local CYAN="\033[36m"
    local RESET="\033[0m"

    local action="$1"
    local manual_url="$2"

    # 帮助信息
    if [ -z "$action" ]; then
        echo "Usage: proxy {set [url] | unset | show | status}"
        echo "  set [url] : 自动轮询代理池设置。如有 url 则强制使用该 url。"
        echo "  unset     : 取消所有代理设置。"
        echo "  show      : 显示当前生效的代理变量。"
        echo "  status    : 【深度体检】测试所有代理对所有网站的连通性。"
        return
    fi

    case "$action" in
        set)
            # 场景1: 用户手动指定
            if [ -n "$manual_url" ]; then
                export http_proxy="$manual_url"
                export https_proxy="$manual_url"
                export HTTP_PROXY="$manual_url"
                export HTTPS_PROXY="$manual_url"
                echo -e "${GREEN}[OK]${RESET} 已强制设置代理为: $manual_url"
                return
            fi

            # 场景2: 自动轮询
            echo "正在自动寻找可用代理..."
            local found=0

            for p in "${PROXY_LIST[@]}"; do
                # 默认只测试第一个网站(百度)来决定该代理是否“活着”
                # 这样速度快。如果需要测试能不能翻墙,可以改测 Google
                local test_url="${TEST_SITES[0]}"

                # echo -n "尝试代理 $p ... "
                if curl --connect-timeout 2 -s -I -x "$p" "$test_url" >/dev/null; then
                    export http_proxy="$p"
                    export https_proxy="$p"
                    export HTTP_PROXY="$p"
                    export HTTPS_PROXY="$p"
                    echo -e "${GREEN}[Success]${RESET} 代理可用: $p"
                    found=1
                    break
                fi
            done

            if [ $found -eq 0 ]; then
                echo -e "${RED}[Failed]${RESET} 代理池中所有代理均无法连接测试网站(${TEST_SITES[0]})。"
                echo "请检查网络,或使用 proxy set <url> 手动指定。"
                return 1
            fi
            ;;

        unset)
            unset http_proxy https_proxy HTTP_PROXY HTTPS_PROXY
            echo -e "${GREEN}[OK]${RESET} 已取消所有代理设置。"
            ;;

        show)
            echo -e "${CYAN}当前环境变量:${RESET}"
            echo "http_proxy  = ${http_proxy:-[未设置]}"
            echo "https_proxy = ${https_proxy:-[未设置]}"
            echo "HTTP_PROXY  = ${HTTP_PROXY:-[未设置]}"
            echo "HTTPS_PROXY = ${HTTPS_PROXY:-[未设置]}"
            ;;

        status)
            echo -e "${CYAN}正在进行全网路况体检 (超时设置: 2秒)...${RESET}"
            printf "%-40s | %-15s | %-s\n" "代理地址 (Proxy)" "目标网站 (Site)" "状态 (Status)"
            echo "--------------------------------------------------------------------------------"

            # 1. 遍历每一个代理
            for p in "${PROXY_LIST[@]}"; do
                # 2. 遍历每一个网站
                for s in "${TEST_SITES[@]}"; do
                    # 提取域名方便显示
                    local domain=$(echo "$s" | awk -F/ '{print $3}')

                    # 测试连接
                    local code=$(curl -I -s --connect-timeout 2 -x "$p" -o /dev/null -w "%{http_code}" "$s")

                    if [[ "$code" == "200" || "$code" == "301" || "$code" == "302" ]]; then
                        printf "%-40s | %-15s | ${GREEN}通畅 (Code: $code)${RESET}\n" "$p" "$domain"
                    elif [ "$code" == "000" ]; then
                         printf "%-40s | %-15s | ${RED}连接超时/失败${RESET}\n" "$p" "$domain"
                    else
                        printf "%-40s | %-15s | ${YELLOW}异常 (Code: $code)${RESET}\n" "$p" "$domain"
                    fi
                done
                echo "- - - - - - - - - - - - - - - - - - - - - - - - - - - - - - - - - - - - - - - -"
            done

            ;;

        *)
            echo "错误: 未知命令 '$action'"
            echo "请尝试: proxy set, proxy unset, proxy show, proxy status"
            ;;
    esac
}
Shell
安装oh-my-zsh并配置
安装 zsh:
sudo apt-get install zsh
安装 oh-my-zsh:
sh -c "$(curl -fsSL https://raw.github.com/ohmyzsh/ohmyzsh/master/tools/install.sh)"
配置插件:
- zsh-autosuggestions
git clone https://github.com/zsh-users/zsh-autosuggestions ${ZSH_CUSTOM:-~/.oh-my-zsh/custom}/plugins/zsh-autosuggestions
- zsh-syntax-highlighting
git clone https://github.com/zsh-users/zsh-syntax-highlighting.git ${ZSH_CUSTOM:-~/.oh-my-zsh/custom}/plugins/zsh-syntax-highlighting
- 启用插件,在
~/.zshrc中修改plugins字段:
plugins=(
    # other plugins...
    git
    zsh-autosuggestions
    zsh-syntax-highlighting
    z
)
另:可以直接安装主题,自带许多开箱即用的配置。
Oh-my-bash
在只有bash的环境下,也可以安装ob-my-bash进行美化
自定义命令
简化的systemctl运维脚本
可以自定义zsh函数,或者写一个shell脚本,之后在zshrc中加入配置项。 我的做法:
- 创建
~/.local/bin/sys,写入sys的脚本 - 在zshrc中
export PATH=$HOME/bin:$HOME/.local/bin:/usr/local/bin:$PATH - 之后就可以使用sys这个命令了 其中sys文件为:
#!/usr/bin/env bash
# ----------------------------------------
# Color helpers
# ----------------------------------------
# 注意:red 输出重定向到了 stderr (>&2),防止被变量捕获
green() { printf "\033[32m%s\033[0m\n" "$1"; }
yellow() { printf "\033[33m%s\033[0m\n" "$1"; }
red() { printf "\033[31m%s\033[0m\n" "$1" >&2; }

# ----------------------------------------
# Fuzzy match service name
# ----------------------------------------
resolve_service() {
    local query="$1"

    # 0. 优先检查:直接看 /etc/systemd/system/ 下有没有这个文件
    # 解决了刚创建文件但 systemd 还没载入导致找不到的问题
    if [[ -f "/etc/systemd/system/${query}.service" ]]; then
        echo "$query"
        return 0
    fi

    # 1. 尝试 systemctl 完整匹配 (包括未激活的 units)
    # 使用 list-unit-files 比 list-units 更全
    if systemctl list-unit-files "${query}.service" &>/dev/null; then
        echo "$query"
        return 0
    fi

    # 2. 模糊匹配
    local match
    # grep -l (list) 可能会更宽泛,这里优化了逻辑
    match=$(systemctl list-unit-files --type=service --all --no-pager --no-legend \
        | awk '{print $1}' \
        | grep -i "${query}" \
        | sed 's/\.service$//' \
        | head -n 1)

    if [[ -n "$match" ]]; then
        echo "$match"
        return 0
    fi

    # 3. 失败
    red "No matching service found for: $query"
    return 1
}

# ----------------------------------------
# Commands
# ----------------------------------------
cmd="$1"
shift

# 如果没有参数,显示帮助
if [[ -z "$cmd" ]]; then
    set -- "help"
    cmd="help"
fi

case "$cmd" in
    status)
        # || exit 1 很重要,如果找不到服务,立即停止脚本
        svc=$(resolve_service "$1") || exit 1
        green "[STATUS] $svc"
        sudo systemctl status "$svc"
        ;;

    restart)
        svc=$(resolve_service "$1") || exit 1
        green "[RESTART] $svc"
        sudo systemctl restart "$svc"
        ;;

    reload)
        # 特殊处理:只输入 sys reload 时重载守护进程
        if [[ -z "$1" ]]; then
            yellow "[daemon-reload] Systemd configuration reloaded."
            sudo systemctl daemon-reload
        else
            # 输入 sys reload xxx 时,重载配置并重启服务
            yellow "[daemon-reload]"
            sudo systemctl daemon-reload
            svc=$(resolve_service "$1") || exit 1
            green "[RESTART] $svc"
            sudo systemctl restart "$svc"
        fi
        ;;

    add)
        if [[ -z "$1" ]]; then
            red "Usage: sys add <name>"
            exit 1
        fi
        svc="${1}.service"
        path="/etc/systemd/system/$svc"

        if [[ -f "$path" ]]; then
            yellow "Service file already exists: $path"
        else
            sudo touch "$path"
            green "Created: $path"
        fi

        sudo ${EDITOR:-vim} "$path"
        yellow "[daemon-reload] Auto reloading after edit..."
        sudo systemctl daemon-reload
        ;;

    edit)
        svc=$(resolve_service "$1") || exit 1
        sudo ${EDITOR:-vim} "/etc/systemd/system/${svc}.service"
        yellow "[daemon-reload] Auto reloading after edit..."
        sudo systemctl daemon-reload
        ;;

    log)
        svc=$(resolve_service "$1") || exit 1
        green "[LOG] $svc"
        sudo journalctl -u "$svc" -f
        ;;

    start|stop|enable|disable)
        svc=$(resolve_service "$1") || exit 1
        green "[$cmd] $svc"
        sudo systemctl "$cmd" "$svc"
        ;;

    where)
        svc=$(resolve_service "$1") || exit 1
        path="/etc/systemd/system/${svc}.service"
        if [[ -f "$path" ]]; then
            green "$path"
        else
            yellow "Not in /etc/systemd/system/, checking system directories..."
            systemctl show -p FragmentPath "$svc" | cut -d= -f2
        fi
        ;;

    kill)
        svc=$(resolve_service "$1") || exit 1
        pid=$(systemctl show -p MainPID "$svc" | cut -d= -f2)

        if [[ "$pid" == "0" || -z "$pid" ]]; then
            red "Service '$svc' has no running MainPID."
            exit 1
        fi

        yellow "Killing process PID=$pid (from service $svc)"
        sudo kill -9 "$pid"
        ;;

    list)
        echo
        green "Enabled services:"
        systemctl list-unit-files --type=service | grep enabled | awk '{print "  ● "$1}'
        echo
        yellow "Disabled services:"
        systemctl list-unit-files --type=service | grep disabled | awk '{print "  ○ "$1}'
        echo
        ;;

    *)
        yellow "Unknown command: $cmd"
        echo "Available commands:"
        echo "  sys status NAME"
        echo "  sys restart NAME"
        echo "  sys reload [NAME]"
        echo "  sys add NAME"
        echo "  sys edit NAME"
        echo "  sys log NAME"
        echo "  sys start / stop / enable / disable NAME"
        echo "  sys where NAME"
        echo "  sys kill NAME"
        echo "  sys list"
        ;;
esac
Docker
1. 更新包索引并安装必要依赖
sudo apt-get update
sudo apt-get install -y ca-certificates curl gnupg
2. 添加 Docker 官方 GPG 密钥
sudo install -m 0755 -d /etc/apt/keyrings
curl -fsSL https://download.docker.com/linux/ubuntu/gpg | sudo gpg --dearmor -o /etc/apt/keyrings/docker.gpg
sudo chmod a+r /etc/apt/keyrings/docker.gpg
3. 添加 Docker 官方仓库
echo \
  "deb [arch="$(dpkg --print-architecture)" signed-by=/etc/apt/keyrings/docker.gpg] https://download.docker.com/linux/ubuntu \
  "$(. /etc/os-release && echo "$VERSION_CODENAME")" stable" | \
  sudo tee /etc/apt/sources.list.d/docker.list > /dev/null
4. 安装 Docker 引擎
sudo apt-get update
sudo apt-get install -y docker-ce docker-ce-cli containerd.io docker-buildx-plugin docker-compose-plugin
5. 配置非 root 用户访问(推荐)
将当前用户加入 docker 用户组以避免每次使用 sudo:
sudo usermod -aG docker $USER
newgrp docker
6. 配置国内镜像源
# 创建或编辑 Docker 配置文件
sudo tee /etc/docker/daemon.json <<-'EOF'
{
    "registry-mirrors": [
        "https://registry.docker-cn.com",
        "https://docker.mirrors.ustc.edu.cn",
        "https://hub-mirror.c.163.com",
        "https://mirror.baidubce.com",
        "https://ccr.ccs.tencentyun.com"
    ]
}
EOF

# 重新加载配置并重启服务
sudo systemctl daemon-reload
sudo systemctl restart docker
7. 验证镜像源生效
sudo docker info | grep -A 1 'Registry Mirrors'
8. 检查 Docker 服务状态
sudo systemctl status docker
Frp内网穿透
待补充
Python
- python安装
sudo apt update
sudo apt install python3 python3-pip
可以在shell中设置alias,把python3改为python
- uv安装
curl -LsSf https://astral.sh/uv/install.sh | sh
uv集成了pyenv的功能,可以自己下载python。创建任意版本的python环境,可以直接指定python版本:
uv venv --python 3.10
Tailscale组网
在机器上安装tailscale
run:
curl -fsSL https://tailscale.com/install.sh | sh
Node.js
# Download and install nvm:
curl -o- https://raw.githubusercontent.com/nvm-sh/nvm/v0.40.3/install.sh | bash

# in lieu of restarting the shell
\. "$HOME/.nvm/nvm.sh"

# Download and install Node.js:
nvm install 24

# Verify the Node.js version:
node -v # Should print "v24.11.1".

# Verify npm version:
npm -v # Should print "11.6.2".
Remote Develop
Remote SSH
在VsCode和Cursor中,都有此插件。选择远程登录时,会先在服务器上安装vscode-server或者cursor-server。注意,如果安装失败,请检查是不是磁盘空间不够! 本地通过ssh连接和远程服务器进行交互,无需设置代理。
使用cursor进行远程开发的时候,需要为远程开发设置好proxy(如果使用的是内网服务器) 请在cursor setting->General->editor setting->open中,找到对应的标签页search "proxy",设置好代理。代理服务器的配置请参考上面科学上网的章节。
例子,设置proxy为"http://usr:passwd@ip:port"
使用秘钥登录
在cursor/vscode进行选择主机进行remote登录的时候,可以选择编辑ssh的配置文件
(windows环境在C:\Users\username\.ssh\config)
可以配置秘钥:
Host ip
  HostName ip
  Port 22
  User vqa
  IdentityFile C:\Users\yama\.ssh\id_rsa_lab
注意这里的IdentityFile填写的是windows下的私钥,而非远程服务器的公钥
其他服务
dify
直接按照官方仓库的做法即可
n8n
先配置nvm/nodejs环境。 在踩了多次坑之后,我觉得n8n部署的方式是:
- 创建一个npm工程,在这个工程中安装n8n,并且在环境变量中指明:
export N8N_USER_FOLDER="$PROJECT_DIR/n8n-local-data",这样所有的用户数据都会在这里。 - 在这个工程下,还可以安装python环境;确保n8n环境不会干扰到其他的地方
值得注意的地方:
- 如果要通过cli来安装社区节点,请在
${N8N_USER_FOLDER}/.n8n/nodes下安装 - 在code节点里面的python是Pyodide,纯沙盒,不能调用本地的python,只能做一些脚本工作......
- 但是在code节点中的js是可以调用任何包的,只需要在安装n8n的目录下安装即可,参考Enable modules in Code node | n8n Docs 我用到的脚本:
#!/bin/bash

# ==========================================
# 1. 路径与环境初始化
# ==========================================
PROJECT_DIR="$(cd "$(dirname "${BASH_SOURCE[0]}")" && pwd)"
source "$PROJECT_DIR/.venv/bin/activate"

# ==========================================
# 2. N8N 核心配置
# ==========================================
export N8N_USER_FOLDER="$PROJECT_DIR/n8n-local-data"
export N8N_PYTHON_BINARY="$PROJECT_DIR/.venv/bin/python"
export NODE_FUNCTION_ALLOW_BUILTIN=*
export NODE_FUNCTION_ALLOW_EXTERNAL=*

# ==========================================
# 3. 网络与服务配置
# ==========================================
export WEBHOOK_URL="http://172.26.41.148:5678/"
export PORT=5678
export N8N_SECURE_COOKIE=false


# ==========================================
# 4. [新增/关键] 禁用遥测与外部连接
# ==========================================
# 彻底禁用诊断数据,解决 fetch failed
export N8N_DIAGNOSTICS_ENABLED=false
# 禁用个人使用情况调查
export N8N_PERSONALIZATION_ENABLED=false
# 禁用版本更新通知
export N8N_VERSION_NOTIFICATIONS_ENABLED=false

# ==========================================
# 5. 性能与维护配置
# ==========================================
export EXECUTIONS_DATA_PRUNE=true
export EXECUTIONS_DATA_MAX_AGE=72
export N8N_DEFAULT_LOCALE=zh

# ==========================================
# 6. 启动 N8N
# ==========================================
echo "--------------------------------------------"
echo "Starting n8n from local project: $PROJECT_DIR"
echo "Python env active: $(which python)"
echo "--------------------------------------------"

"$PROJECT_DIR/node_modules/.bin/n8n" start
Fluent Editor
准备再开一个章节写Editor的配置
Zed编辑器
在zed编辑器中,加上自定义支持ACP协议的模型:
  "agent_servers": {
    "Kimi CLI": {
      "type": "custom",
      "command": "kimi",
      "args": ["--acp"],
      "env": {}
    }
  }
overleaf
仓库:Github自己搜
文档:Upgrading TeX Live | On-premises | Overleaf docs
需要注意的是,在overleaf中,需要bin\shell进入容器里,然后下载完整的texlive
tlmgr install scheme-full
在安装前,先配置好南大镜像源:
tlmgr option repository https://mirrors.nju.edu.cn/CTAN/systems/texlive/tlnet
之后,注意:[Upgrading TeX Live | On-premises | Overleaf docs](https://docs.overleaf.com/on-premises/installation/upgrading-tex-live#saving-your-changes save changes
My server overview
| Server name | IP(NJU or Public) | IP(Tailscale) | service+port | other info | |
|---|---|---|---|---|---|
| yamalab | 172.26.41.148(NJU) | 100.122.147.99 | gitea:3000 dify:80 n8n:5678 immich:2283 | 校内主服务器、内有mihomo | |
| overleaf | 172.26.4.134(NJU) | 100.124.96.20 | overleaf:80 newapi:3000 mc:25565 | 校内服务器 | |
| izj6c2pom9q4lr1zpofa88z | 47.76.41.45(Hong Kong) | 100.103.80.30 | 无应用 | 200M带宽,2H 0.5G | |
| hcss-ecs-99ab | 115.175.12.31(China mainland) | 100.122.89.125 | 无应用 | 小带宽2M,2H2G |
记不得了旧点到这里去看Google AI Studio
通过iptable进行端口转发,把流量转到校内,其他的就直接用代理 如果忘记之前是怎么配置的,务必要看nginx!!! ssh -N -D 127.0.0.1:1080 -J yama@172.26.41.148 root@47.76.41.45
 chatGPT给我的年度诗篇 ```text